User guide
These screenshots show the same Vue screens shipped by KeenProxy, running in the independent browser demo. Addresses, counters, profiles, and results are synthetic. The guide covers the implemented interface, rather than promising every feature shown in historical mockups.
1. Read the overview
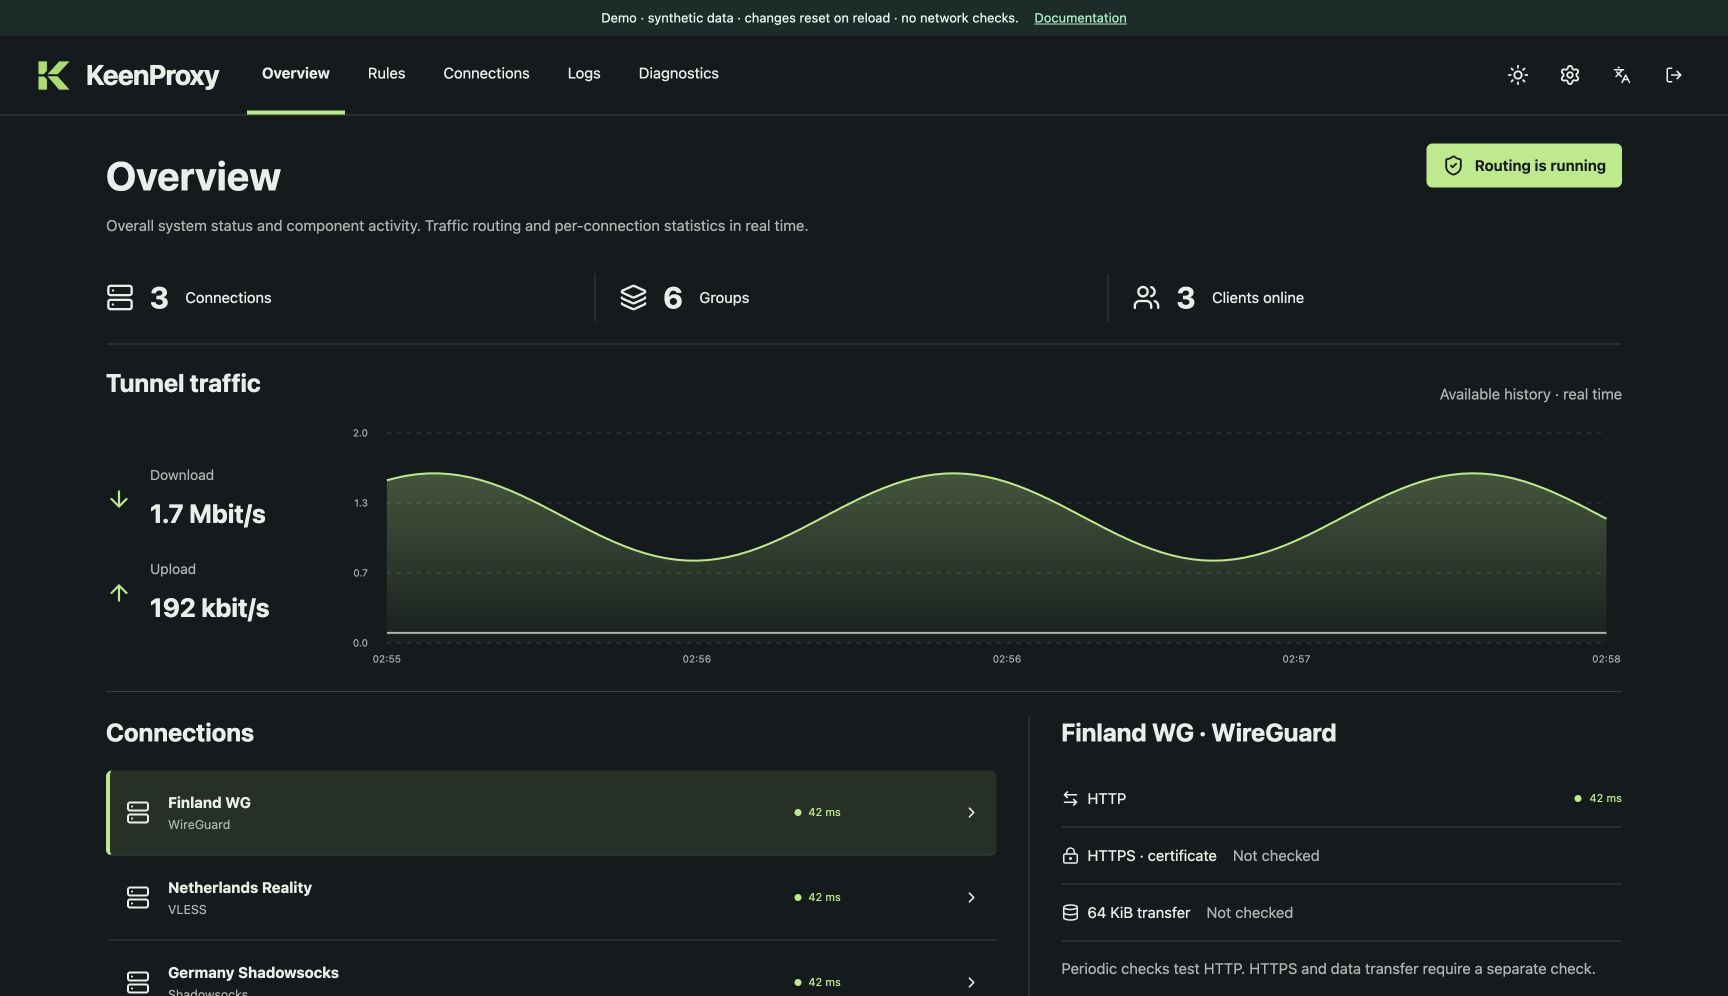
Open Overview to see connection health, recent traffic, and the router's CPU and memory usage. The first resource row covers the whole router. The KeenProxy row shows its share of total router CPU time and its resident memory (RSS). This includes embedded sing-box. An external TrustTunnel client is measured by the router totals. When a new release is available, follow its notice to Settings. Traffic graphs describe observed activity and cannot establish whether traffic leaks.
2. Configure a connection
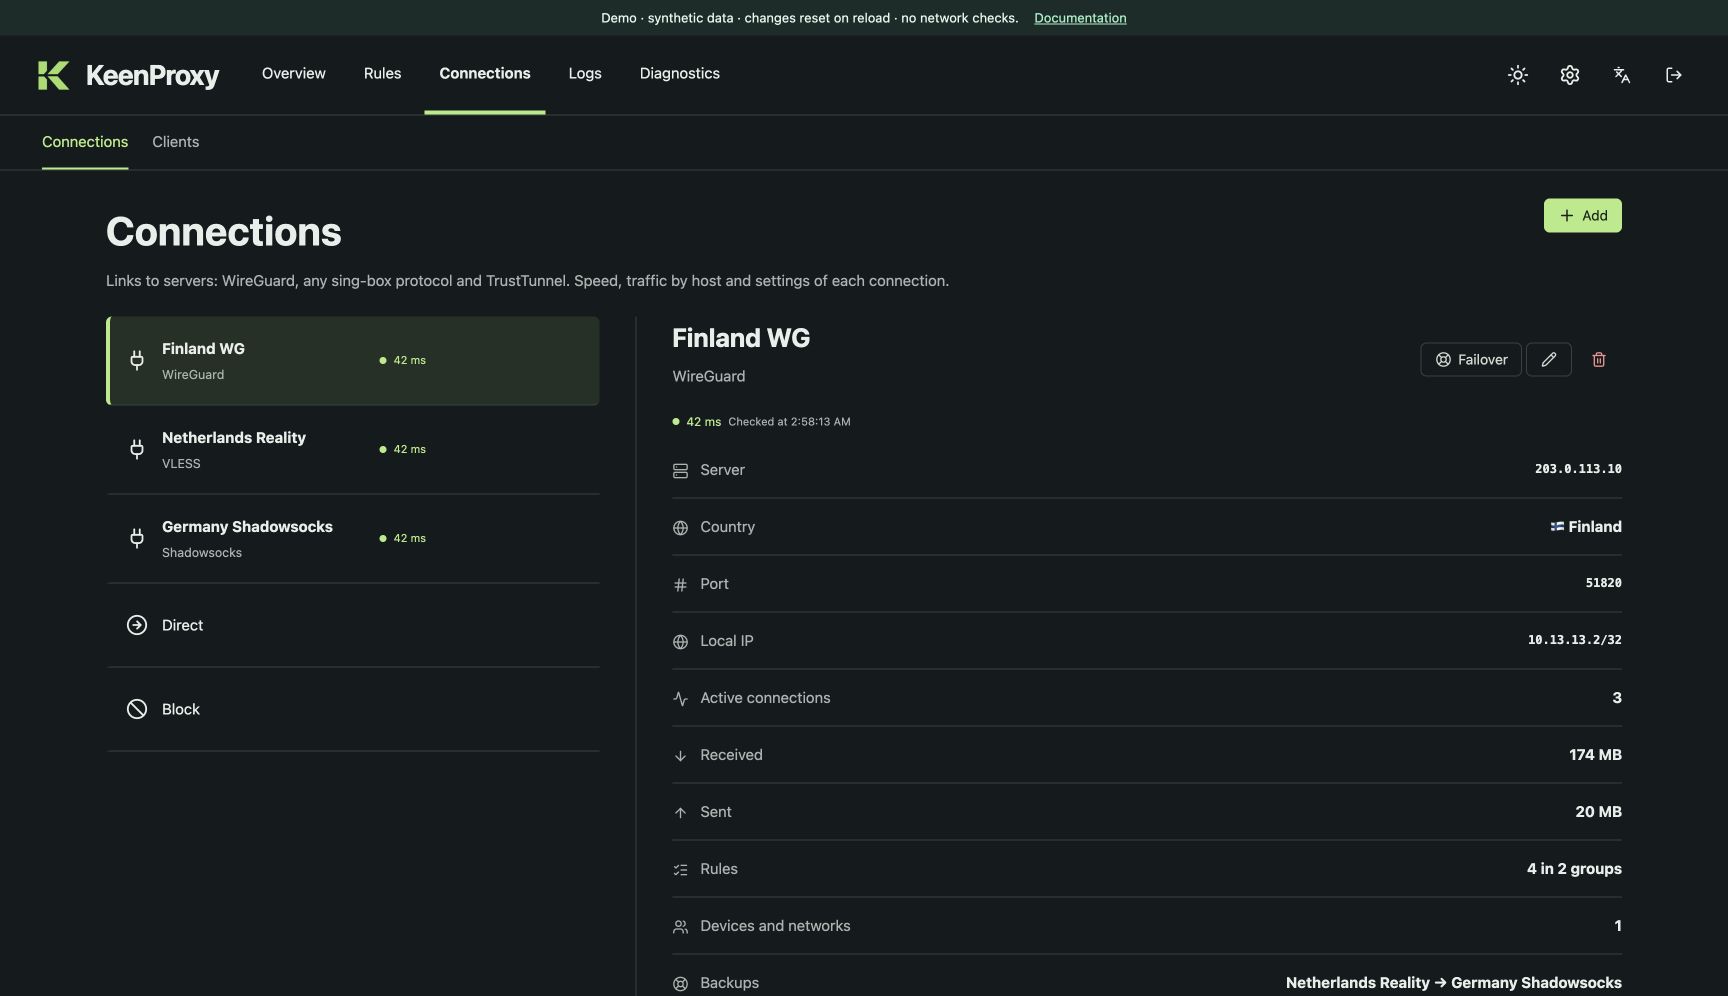
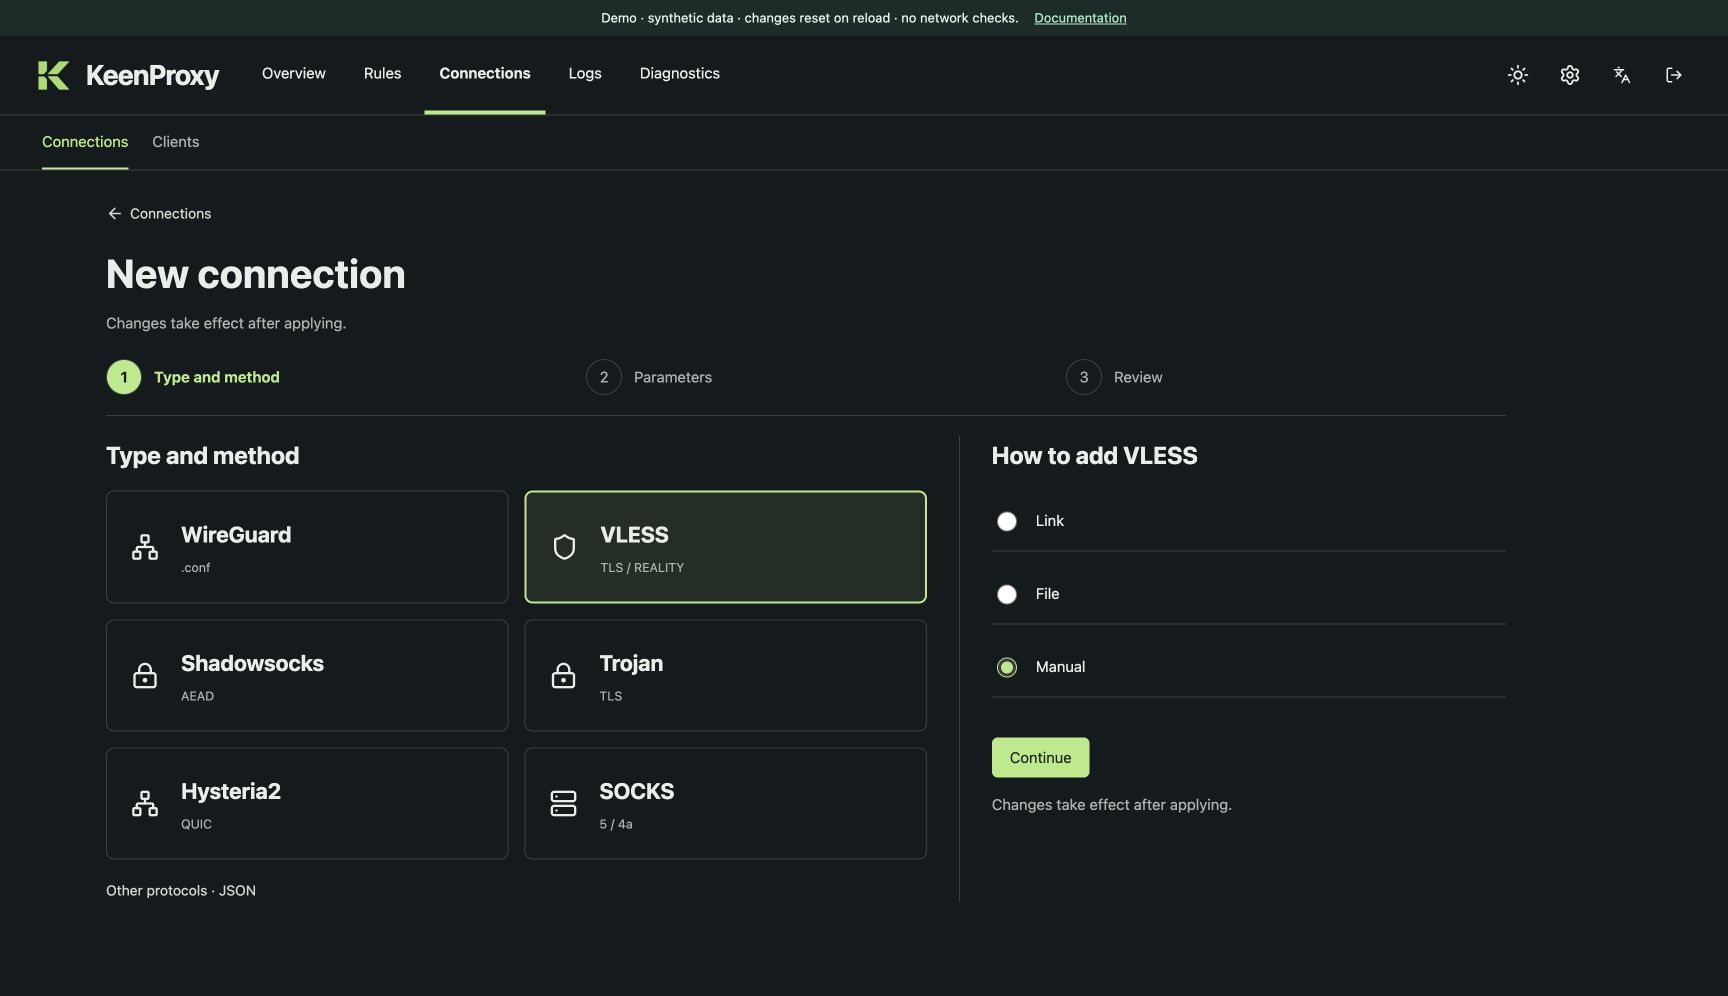
Open Connections. Select a profile to inspect its settings and status. Choose Add to use the wizard: import a supported connection link/file or enter a supported protocol manually. Use a descriptive name and inspect the proposed protocol and endpoint before accepting.
The file picker accepts .conf, .txt, and .json up to 2 MiB. For a sing-box file with multiple profiles, choose the outbound or endpoint to import. Router DNS and routes stay under KeenProxy control. In Failover, choose the immediate backup and review the inherited chain. Connection parameters stay hidden until you reveal them. See how failover works.
Changes enter the shared draft. Real credentials belong only in your local management session. In the browser demo, use synthetic values.
3. Add a routing group
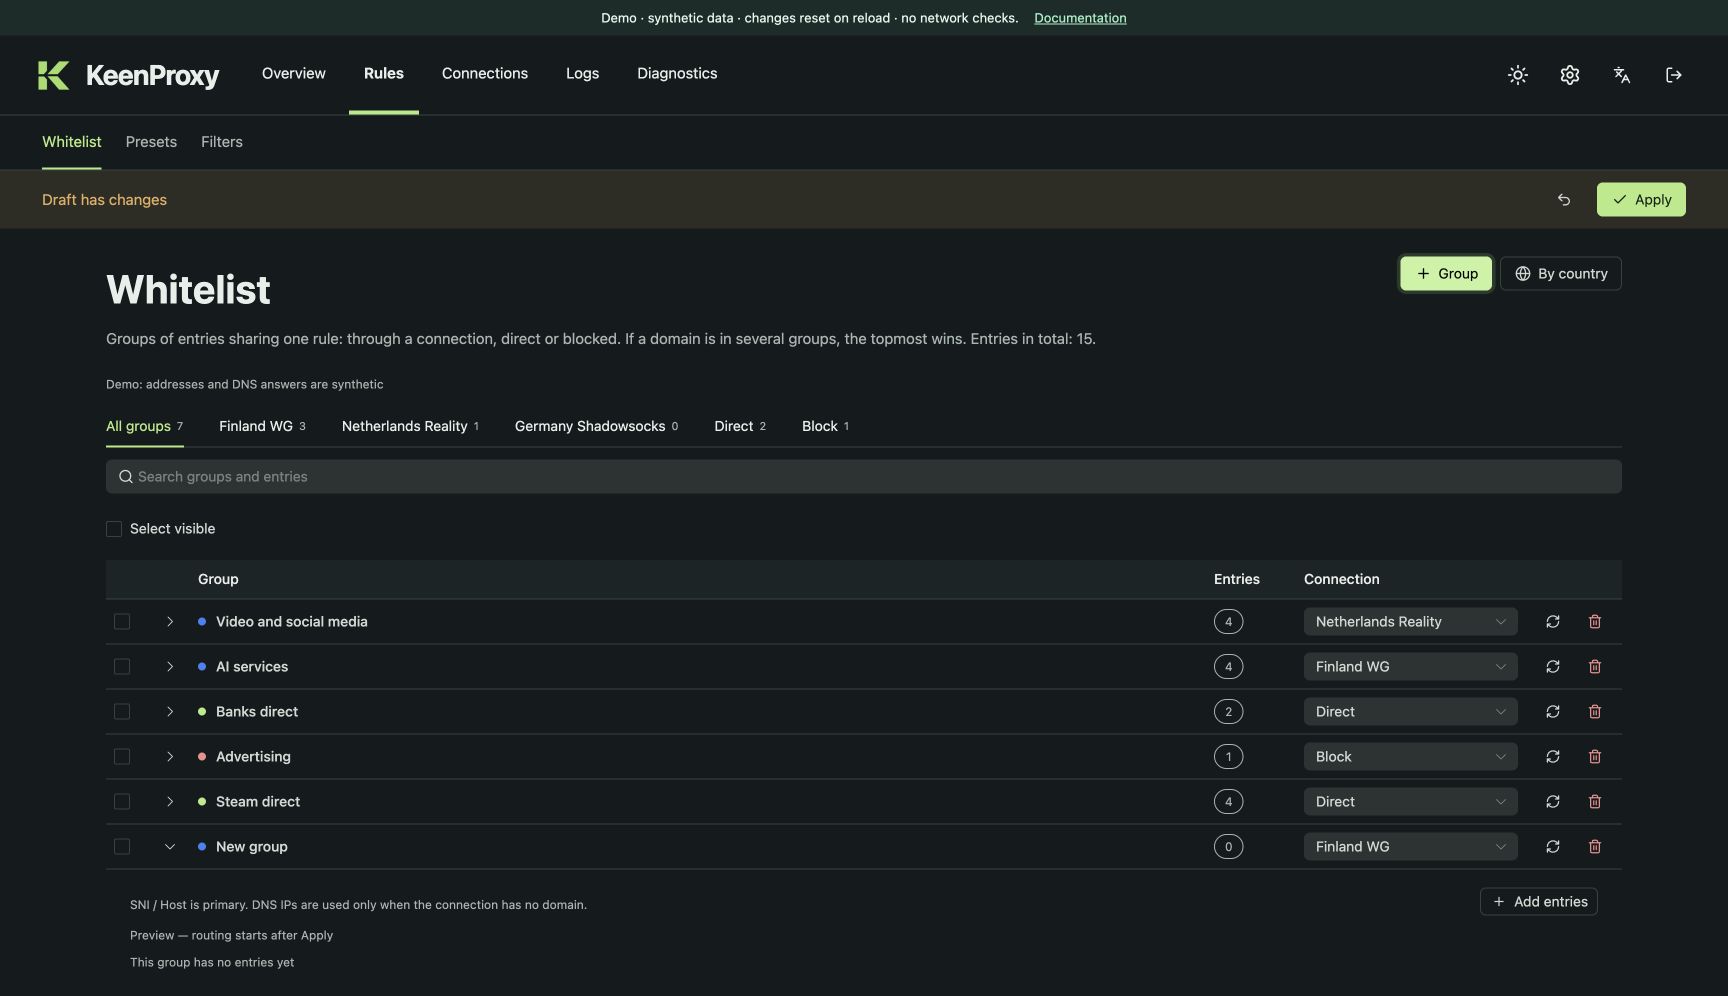
Open Rules → Whitelist. Create a group, name it, select its target connection (or Direct/Block), and add domains or addresses. For example, direct work.example.com to the Netherlands profile. Review imported entries before confirming; country selectors express broader policies.
To move several domain or country groups together, select their checkboxes, choose a target in Change route, and review the preview. Groups hidden by a filter can still be selected. Choose Save to draft, then Apply when ready.
Expand an entry to see its current DNS observations and expiration. A resolved address alone does not prove that application traffic followed the intended tunnel.
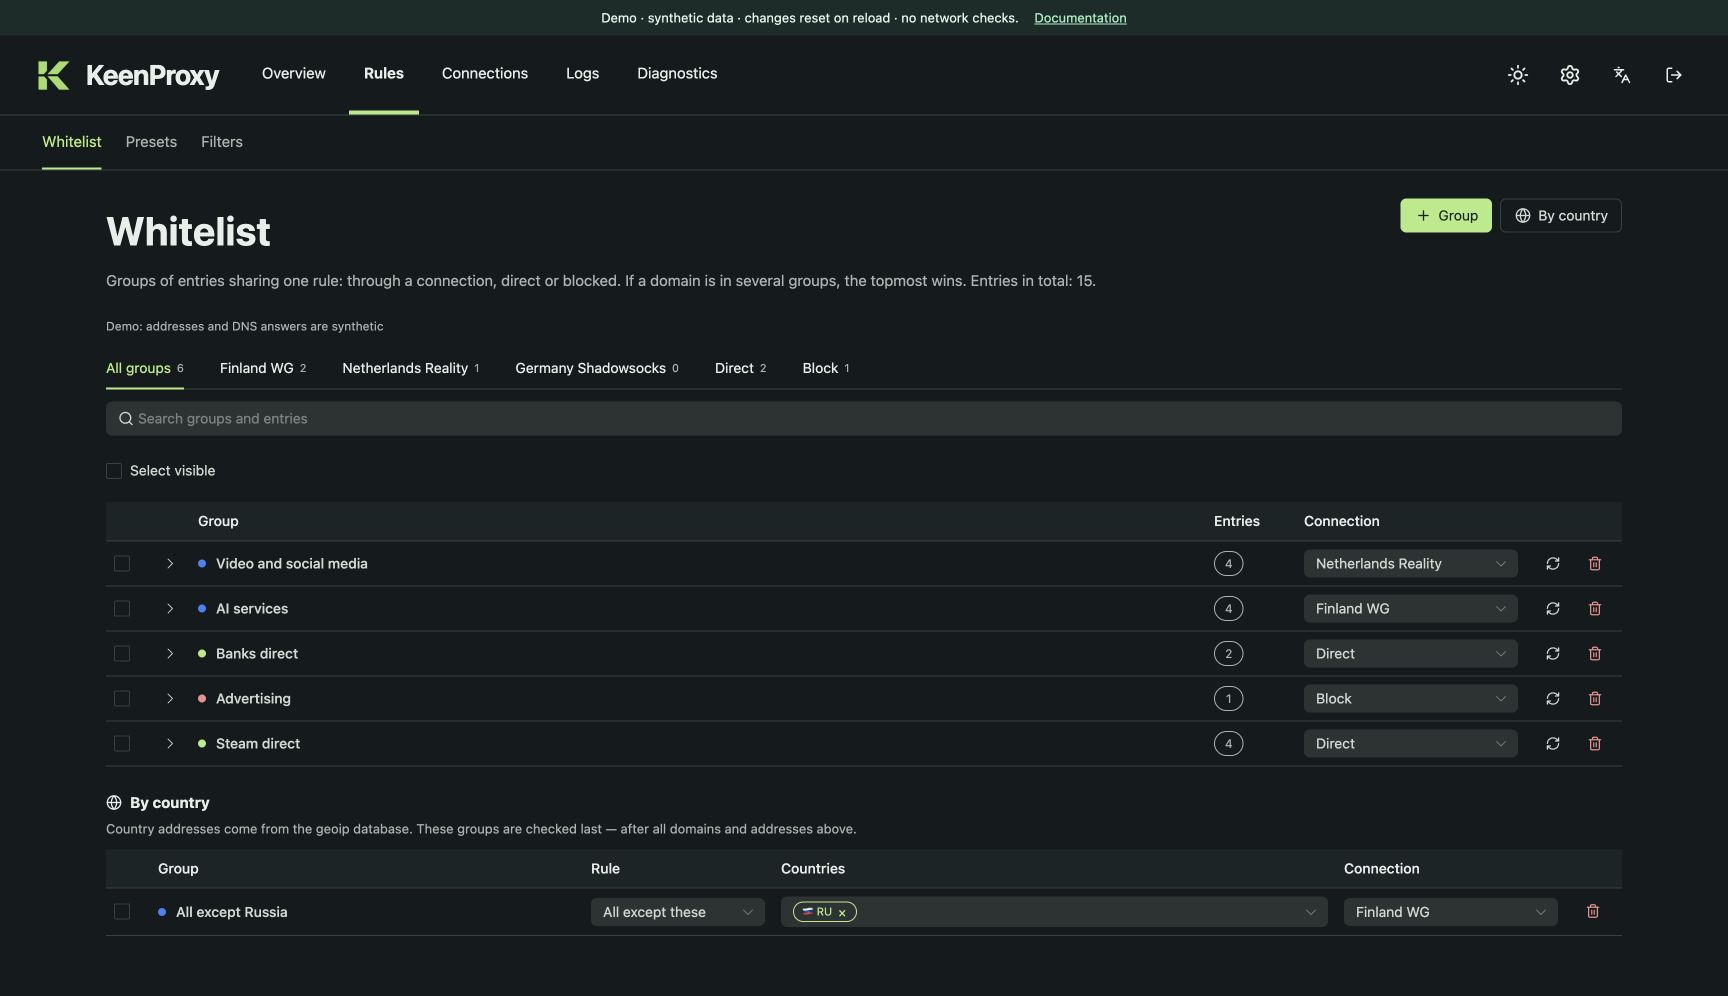
See Country rules for an illustrated setup, country exclusions, and rule precedence.
4. Try a preset
Open Rules → Presets, select a target, then preview a collection. Inspect the added/removed entries and accept it into the draft. Presets can be enabled, disabled, or removed. The static demo includes one original example collection; it does not redistribute the full community catalog.
The catalog shows domain lists without resolving them. KeenProxy resolves IPs for enabled presets after Apply. Enable Update with new app versions to adopt changes to the bundled preset after upgrading KeenProxy. To block ads or other domains through DNS, see DNS filters.
5. Choose devices and networks
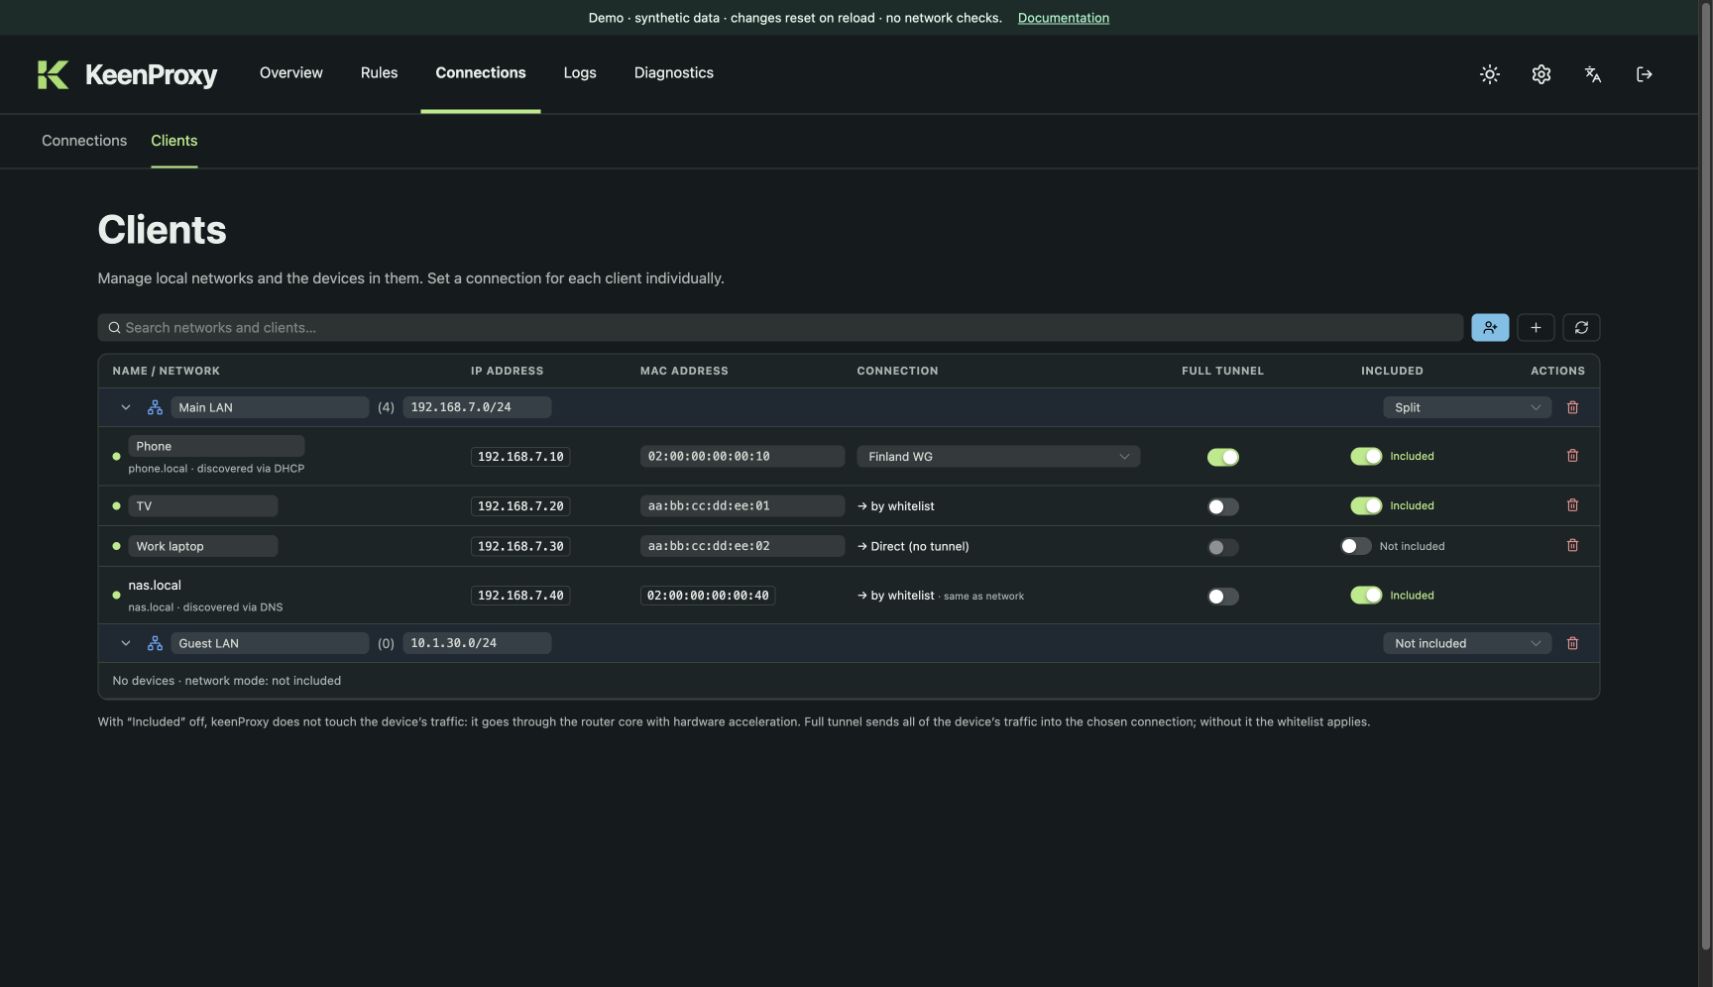
Open Connections → Clients. Network defaults apply to matching subnets; per-device entries let you select a policy for individual clients. Split uses selective rules, Full selects a default connection, and Off bypasses KeenProxy interception for that policy. Review both the device and network settings before Apply. When available, the device row also shows a discovered hostname and its DHCP/DNS source. A manually assigned name takes priority; searching matches either name. Discovery refreshes in the background and does not write names to configuration.
6. Review and Apply
The change bar appears whenever the draft differs from the saved configuration. Review changes across screens, then choose Apply once. Wait for success. If validation/application fails, read the error and correct the draft. Discard restores the last saved snapshot.
7. Verify the result
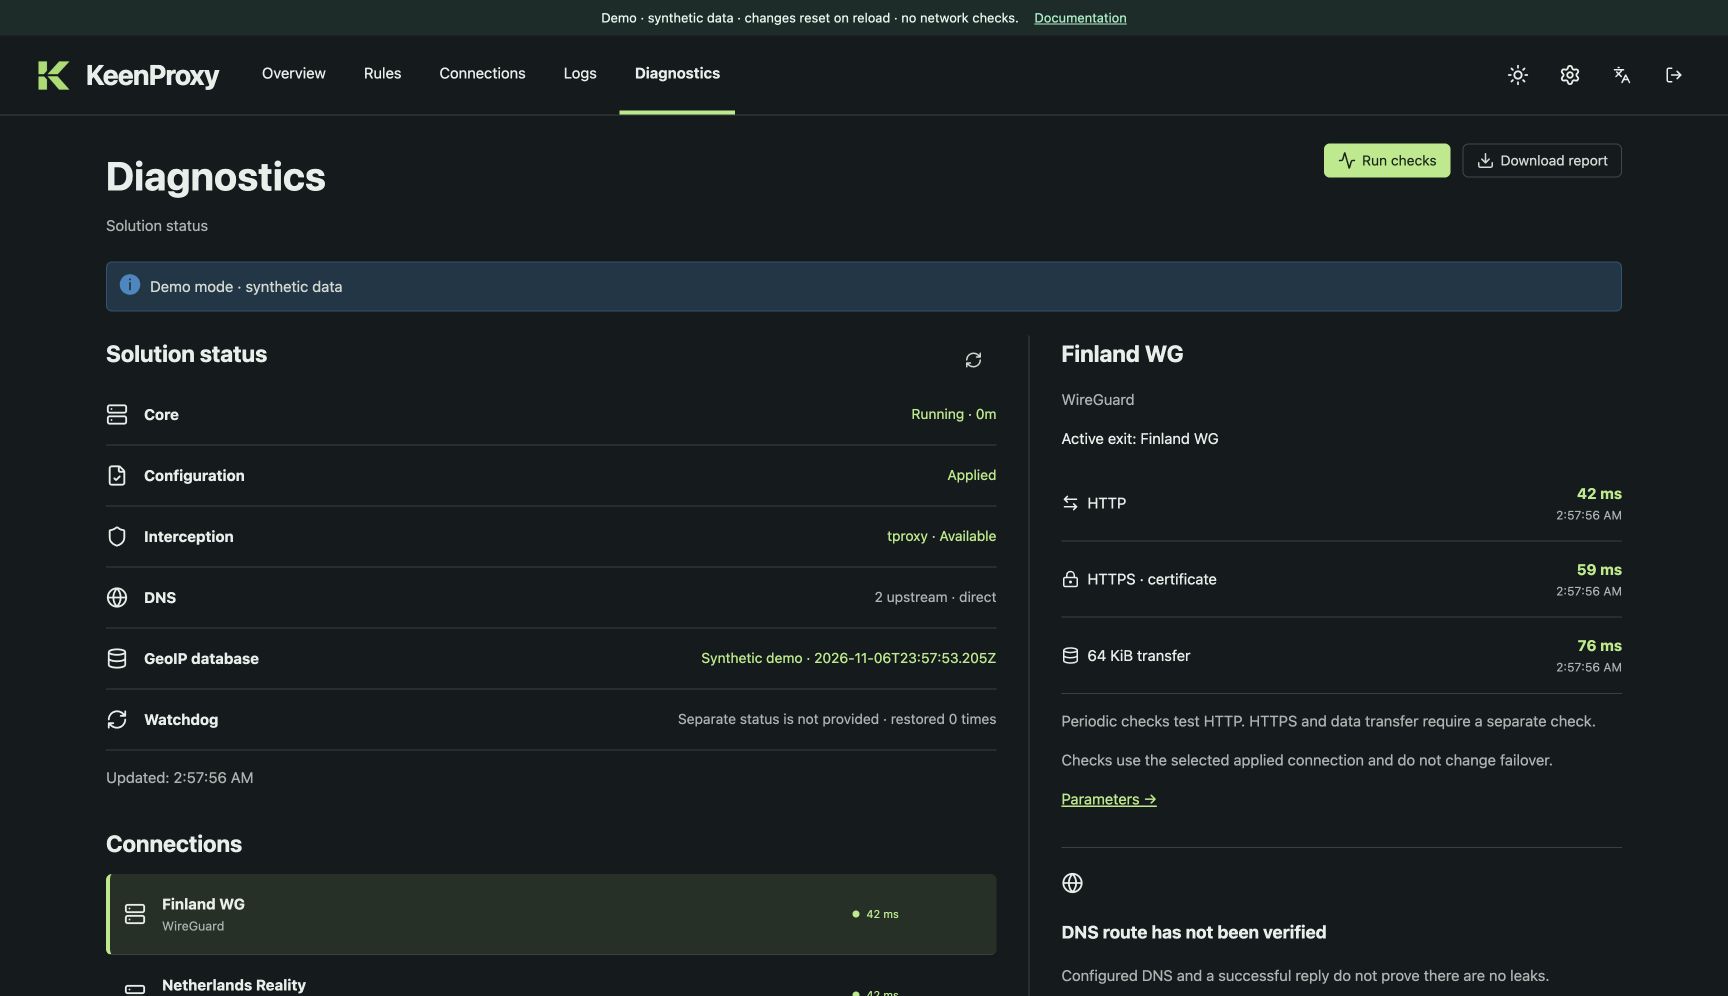
Open Diagnostics to see core uptime, applied configuration, interception, DNS settings, GeoIP, and the firewall restoration counter. Select an applied connection and choose Run checks to test HTTP, HTTPS with certificate verification, and a 64 KiB transfer separately. A new or edited profile must be applied first. The results leave the active failover selection unchanged. The DNS row describes the configured path. Use a test from the affected device to verify the actual path. The browser demo labels its check results as simulated and hides the ZIP download button.
Export journals and diagnostics
On the router, open Diagnostics → Diagnostics archive → Download ZIP. See what each download contains and what to review before sharing.
Watchdog recovery events include the failed firewall check and the verification result. The ZIP retains safe structured evidence. See watchdog diagnostics.
Inspect one routing decision
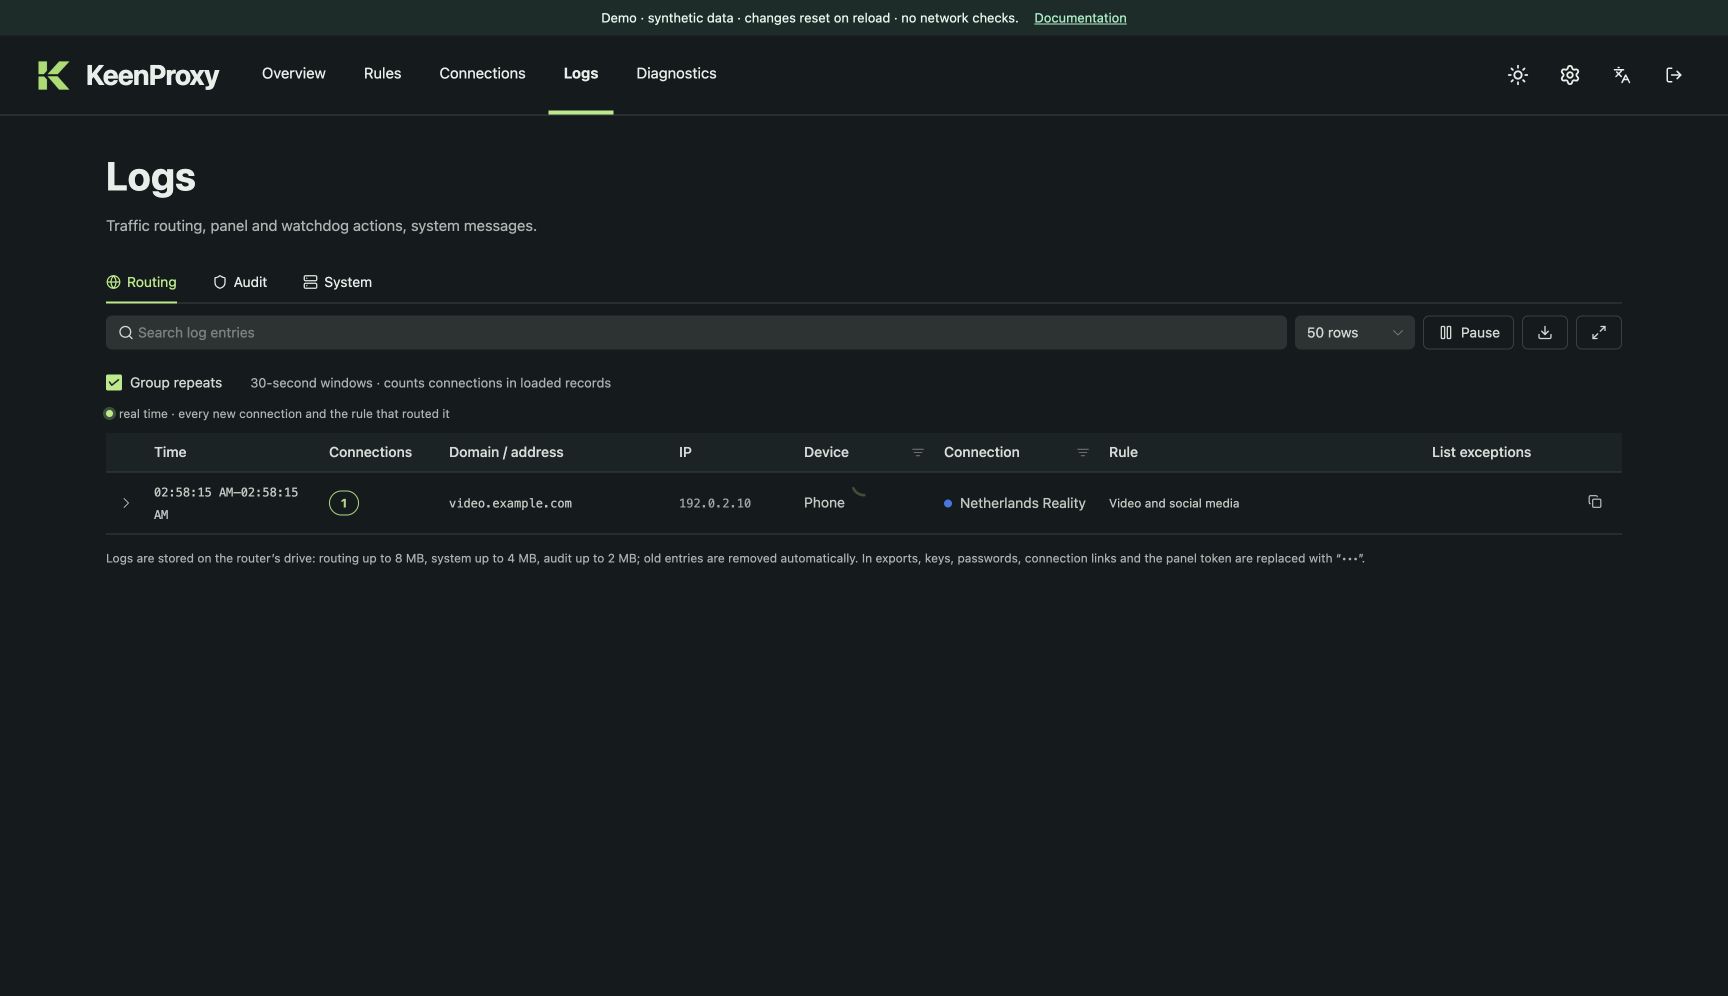
Open Logs and switch between Routing, Audit, and System. In Routing, Group repeats combines matching loaded records in 30-second windows. Expand a group to see its members or clear the checkbox for individual entries. Search and filters narrow the view. A routing record explains which outbound was selected. Check the application separately to confirm that the connection and transfer succeeded. New routing records in the browser demo are generated locally by the simulation.
8. Find settings and manage backups
Open Settings with the gear icon. On narrow screens, choose a section from the dropdown. DNS opens by default. Use YAML configuration to manage backups. Use Network and interception for REDIRECT/TPROXY and interfaces, Panel access for the listener, token path, and trusted networks, and Country databases for GeoIP status. Use Language and theme for browser preferences. Routing and access changes use the shared Apply action. Changing the panel listener or token file also requires a service restart. Updates has its own controls.
Open Settings → DNS to choose the primary and secondary DNS servers. Choose a provider and protocol from the list or select Custom DNS server and enter an IP address or a DoH, DoT, or UDP URL. The provider list includes Cloudflare, Google Public DNS, Quad9, AdGuard, Yandex DNS, Cisco OpenDNS, CleanBrowsing, and Control D. Each choice shows its filtering policy. KeenProxy tries the primary first and uses the secondary if the primary is unavailable. To change the resolver list, specify two different servers. Existing configurations with fewer servers can still be used and saved when the list is unchanged. Advanced settings contains any additional resolvers, bootstrap addresses, and the listening address. The DNS route and tunnel failure policy are configured separately.
Open Settings → YAML configuration to import, export, or restore a configuration. Importing or restoring prepares a draft. Review it and Apply. Keep unredacted backups private. The browser demo exports synthetic JSON-compatible data and disables YAML import.
9. Install or roll back a release
The panel footer shows the running release and build variant, architecture, and short commit hash. A local build may lack a release tag or commit hash. Settings → Updates also shows the available update and the previous version when known. Diagnostics → Build details lets you copy the running build identity. The diagnostics ZIP includes the same information in status.json.
Open Settings → Updates. Apply or discard any routing draft before installing or rolling back. Confirm the version and wait for the service to reconnect. You can save a time for automatic installation or leave it off and install releases when ready. See the update guide for first-time setup and rollback requirements.